Tuesday, October 30, 2012

Hyperpin Virtual Pinball Part 2/3


Here's the second installment of my Hyperpin Virtual Pinball project. Now it's time for painting and electrical. I decided to paint it semi-gloss black for the outside and flat black in the inside. I used Bosny spray paint in cans.  I used Polituff for my filler. It's usually used in cars because it's stronger and more durable. I didn't imagine this to be this heavy it's because of the mdf wood that i used. The good side in using mdf wood is that i doesnt needs too much sanding because it's already smooth but the bad part is it's so heavy. I drilled all the holes for the button and the fans and smooth the edges before painting. I think I used up 10 spray cans in all of this. I didn't paint primer I just directly sprayed layers of paint until its pitch black.


Grills for the exhaust fan.


This are aluminum lock guide for the acrylic bezel.


I tried fitting the backglass LCD monitor and it fits like a charm. I also put 3 X 10 watts flourescent bulbs to backlight my customized bezel.

Looking good!


This is my keyboard encoder called the ipac. The I-PAC (Interface for Pc to Arcade Controls) is a board which allows connection of arcade controls such as buttons and joysticks to a keyboard port or USB port on a PC motherboard. It was designed around the MAME emulator which supports over 1000 arcade games and can be used with other emulators. Here's the link for the website ULTIMARC

I decided to put led lights in the top and at the back so it will look beautiful in the dark and to have that authentic arcade feel.

Back View

LED Lights

I mounted the switch for the fans, LED lights and the backlight for the bezel on top of the back box.


This what the top looks like in the dark.

I also installed a sound controller for the led lights so it will react to the sound of the pinball game.


The view from inside.

I labeled it for easy troubleshooting in the furture.

12 volts supply with the fuse.

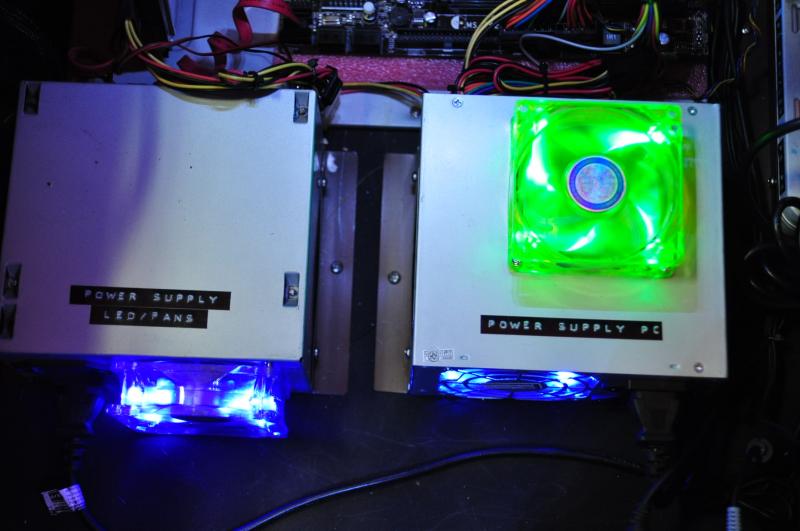
Power supply for the fans, led and the PC.

Service buttons for the pinball games.

Front view of the playfield. I'm planning to put led lit fans and coinslot mounted in acrylic glass.

LED buttons bought from HK.


Please wait for the last part of my project. Feel free to ask if you have some questions. I will post videos of the pinball in action. Thanks for viewing!

Saturday, October 27, 2012

Hyperpin Virtual Pinball Part 1/3

I decided to build a virtual pinball cabinet running on Hyperpin Frontend  with  Visual Pinball and Future Pinball tables. I'm not really a pinball fanatic but I got these surplus LCD monitors from a friend and I have no use for it since it doesnt have a tuner and only works in PC. So I decided to make use of it and build a Hyperpin Cabinet. I will be using a 2 monitor setup. 30 inch for the backglass and 37 inch for the playfield. I will be using a Dual core Athlon procie, Palit GTX 240 video card and 2 gb ram of memory. This project is not for newbies. You must have technical skills and have lots of patience. Here is the links of the software. All of them are free and feel free to ask me for questions on how to set it up.


Hyperpin - This is a software that allows you to choose from a variety of pinball games. This is the only pinball frontend I know and probable youré best choice. It has stunning graphics and fully customizable.

Visual Pinball -It's a freeware video game engine for running pinball games. What's good about this software is it's realistic simulation of ball physics and it's integration of roms from original tables. The only downside I know is that it's graphics is not yet 3D.

Future Pinball - It's also a freeware game engine for running pinball games. What's good about this software is the stunning realistic 3D graphics. The downside to this is the non realistic ball physics and lack of rom integration.


30 inch monitor for the backglass


Taking apart the LCD TV casing to make it smaller.

Removing the back cover.

Removing the bezel.

Testing the 30 inch Backglass and adjusting the size.
The back box casing for the backglass.

Side View

Back View

The DMD Bezel

It's me @ work. Remember dont forget to wear mask and googles!
The playfield.


Testing if the LCD fits.


Tuesday, October 9, 2012

PS2 Customized Shooting Arcade


I decided to customized a ps2 gun arcade shooting game to to try out guncon2 games like Time Crisis and Vampire Night. I got these EMS Topgun II Lightgun from Playasia to try out.  EMS Topgun II can be used in PS2, PC, XBOX and PS3 (Guncon 2 games only). What's amazing with these gun is that it has recoil function not like the original Namco Guncon2. The gun is also very accurate! The only downside for me is the buttons specially the directional buttons at the back. They don't feel solid and durable. Here's the link http://www.hkems.com/product/xbox/EMSTopGun2.htm


I bought this Guitar Hero pedal from a surplus shop and I decided to use this as my pedal for playing Time Crisis


I used a mini pl connector to connect it to my ps2 controller to trigger the reload.


I soldered the wires from the mini pl connector to the controller. You can solder it it to any buttons you like since it all triggers the reload key.


Heres the the game timer I use. This is connected to the controller port of the ps2 cutting the ground on the controllers so when the timer is 0 the you can't use the controllers.


The left wires is the cut timer for the controllers the right ones is connected to the cabinet buttons for reset and game select.


Heres the coinslot. Theres two coinslot so if ever one malfunctions theres still one you can use. Basically a backup.


EMS Topgun II Sensors on both sides of the TV


Here's the EMS Topgun sensor mounted on the side of the TV.


The button on the right is connected to the reset and power button of the PS2.


The Front View

Side View

This is where you put the controllers.
The backdoor where I put all of the arcades components.

Heres the inside of the cabinet.


I'm using a modified PS2 with Matrix Infinity chipset so it automatically boots dev2 or from the hdd. You can also softmod your ps2 using your memory card. You need Free MCboot. Heres the link to the site. http://freemcboot.info/. I will post a video of this in action after I've converted the videos. If you have questions feel free to ask me.